
Clipping masks are a powerful and versatile tool in Adobe Illustrator that allows you to control the visibility of artwork based on a predefined shape or path. They can be used to create all kinds of effects, from simple cutouts to complex textures and patterns.
In this tutorial, we’ll cover everything you need to know about clipping masks in Illustrator, starting with the basics and moving on to more advanced techniques. Whether you’re a beginner looking to learn the fundamentals or an experienced designer looking to take your skills to the next level, this tutorial has something for you.
We’ll cover topics such as creating and editing clipping masks, using multiple objects as clipping masks, working with complex shapes and paths, using gradients and transparency with clipping masks, and much more. By the end of this tutorial, you’ll have a deep understanding of the power and flexibility of clipping mask Illustrator, and be able to apply these techniques to your own projects.
What is a Clipping Mask?
Clipping mask is a way to control the visibility of artwork based on a predefined shape or path. You can think of it as a kind of stencil or mask that determines which parts of your artwork are visible and which are hidden.
To create a clipping mask, you need two objects: the object you want to mask (the “clipped object”) and the object that will be used as the mask (the “clipping object”). The clipping object can be any shape or path, and it’s typically placed on top of the clipped object.
When you apply the clipping mask, the clipped object will only be visible within the boundaries of the clipping object. Any parts of the clipped object that fall outside the boundaries of the clipped object will be hidden.
Importance of Clipping Mask Illustrator
One of the key benefits of clipping masks is their flexibility. They can be used for a wide range of effects and designs, making them a versatile tool for any designer. Additionally, they are non-destructive, meaning they don’t permanently alter your artwork, allowing you to make changes later on without having to start from scratch.
Control Visibility: Clipping masks allow you to control the visibility of artwork based on a predefined shape or path. This means you can easily show or hide certain parts of your artwork, giving you greater control over the design.
Non-Destructive: When you apply a clipping mask, it doesn’t permanently alter your artwork. Instead, it simply hides certain parts of the artwork based on the shape of the clipping object. This makes it easy to make changes to the artwork later on without having to start from scratch.
Compatible with other Adobe applications: Clipping masks are compatible with other Adobe applications such as Photoshop and InDesign, making it easy to import or export your artwork between different programs.
Clipping masks can also help improve your workflow by allowing you to focus on specific parts of your artwork, and by organizing your layers and groups more effectively. They are also compatible with other Adobe applications such as Photoshop and InDesign, making it easy to import or export your artwork between different programs.
Basic Clipping Mask Techniques
A basic clipping mask is a tool in graphic design and image editing software that allows you to create a mask that limits the visibility of an image to the shape of another object or layer. In other words, a clipping mask is a way to create a frame or container that restricts the visibility of an image to a specific area.
How to Create a basic clipping mask in Illustrator?
To create a basic clipping mask, you first create a layer or shape that you want to use as a mask. Then, you place the layer or image you want to mask above the mask layer and select “Create Clipping Mask” in the layer options. This will restrict the visibility of the image to the shape of the mask layer.
Here are the steps to create a basic clipping mask in Adobe Illustrator:
1.Open your Illustrator document and select the object that you want to use as the clipping mask. This could be a shape or text box, for example.
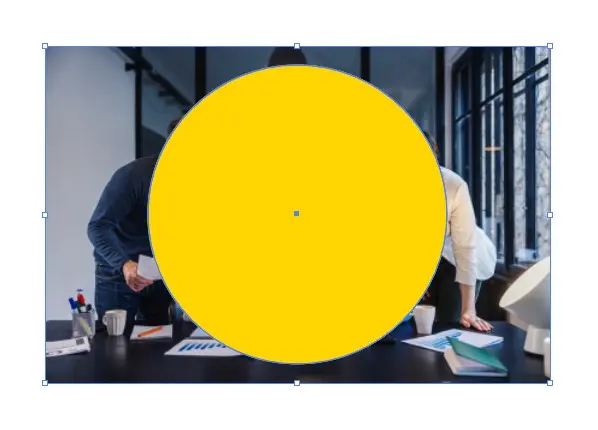
2. Create the object that you want to clip to the mask. This could be an image or another shape, for example. Make sure it is positioned above the clipping mask in the Layers panel.
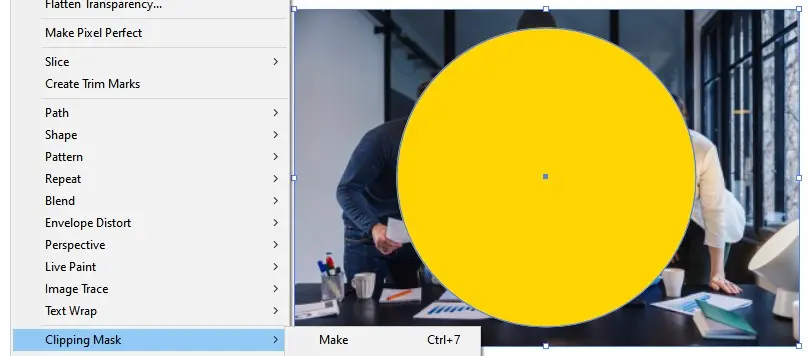
3. Select both the clipping mask and the object to be clipped by holding down the Shift key and clicking on each one.

4. With both objects selected, go to Object > Clipping Mask > Make, or use the keyboard shortcut Ctrl+7 (Windows) or Command+7 (Mac).

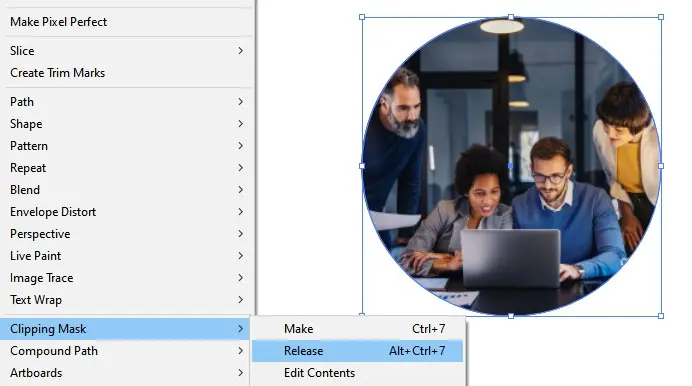
5. The object you want to clip should now be clipped to the mask object. You can see this in the Layers panel, where the clipped object will be indented and nested under the clipping mask object.
6. To edit the mask, simply select the clipping mask object and make the desired changes. For example, you could change the shape or position of the mask object, or adjust the fill or stroke properties.
7. To edit the clipped object, select it in the Layers panel or click on it with the Direct Selection tool. You can then make changes to the object as usual.
8. If you want to release the clipping mask and remove the clipping effect, select the clipped object and go to Object > Clipping Mask > Release, or use the keyboard shortcut Ctrl+Alt+7 (Windows) or Command+Option+7 (Mac).
That’s it! You now know how to create a basic clipping mask in Adobe Illustrator.
Advanced Clipping Mask Techniques
Advanced clipping masks in Adobe Illustrator are used to create complex shapes or effects that go beyond the basic rectangular or circular shapes of a standard clipping mask. With advanced clipping masks, you can use any object or group of objects as the mask, and you can also apply transparency and blending modes to create interesting effects.
How to Edit Advanced Clipping Masks in Illustrator?
To create an advanced clipping mask in Illustrator, you can follow a similar process to creating a basic clipping mask, but with additional steps. First, create the mask object or group of objects, and then position the object or group above the object to be clipped. Then, select both objects and go to Object > Clipping Mask > Make, or use the keyboard shortcut Ctrl+7 (Windows) or Command+7 (Mac).
Here are the step-by-step instructions for editing advanced clipping masks in Adobe Illustrator:
- Open your Illustrator document and locate the advanced clipping mask you want to edit. This can be a complex shape, texture, or effect created with one or more objects.
- Select the mask object or group of objects by clicking on it with the Selection tool. The mask object should be positioned above the object to be clipped in the Layers panel.
- To edit the mask, you can use any of the standard Illustrator tools, such as the Pen tool, Shape tools, or the Pathfinder panel. Make the desired changes to the mask object, such as adjusting its shape, size, or position.
- Once you have edited the mask object, select both the mask object and the object to be clipped by holding down the Shift key and clicking on each one.
- Go to Object > Clipping Mask > Edit Mask, or use the keyboard shortcut Ctrl+Alt+7 (Windows) or Command+Option+7 (Mac). This will bring up the Clipping Mask editing mode, which displays the clipped object and the mask object separately.
- In the Clipping Mask editing mode, you can further edit the mask object by using any of the standard Illustrator tools. You can also move or resize the clipped object within the mask, or make changes to its properties.
- Once you have finished editing the mask and the clipped object, click anywhere outside the Clipping Mask editing mode to exit and apply the changes.
- If you want to release the advanced clipping mask and remove the clipping effect, select the clipped object and go to Object > Clipping Mask > Release, or use the keyboard shortcut Ctrl+Alt+7 (Windows) or Command+Option+7 (Mac).
That’s it! With these steps, you should be able to edit advanced clipping masks in Adobe Illustrator. Keep in mind that advanced clipping masks can be complex and may require some trial and error to achieve the desired effect, so don’t be afraid to experiment and try different approaches.
Examples of Advanced Clipping Masks

Custom Clipping Masks
Custom clipping masks in Adobe Illustrator are a type of clipping mask where the mask is created using a custom shape, rather than a standard shape such as a rectangle or circle. With custom clipping masks, you can create masks in any shape or design you want, and use them to clip any object or group of objects in your document.
How to Edit Custom Clipping Masks in Illustrator?
To create a custom clipping mask in Illustrator, you first need to create the shape you want to use as the mask. This can be done using any of the standard Illustrator tools, such as the Pen tool, Shape tools, or the Pathfinder panel. Once you have created the mask shape, position it above the object or group of objects you want to clip in the Layers panel.
Here are the step-by-step instructions for editing custom clipping masks in Adobe Illustrator:
- Open your Illustrator document and locate the custom clipping mask you want to edit. This can be any shape or design you’ve created using the Pen tool, Shape tools, or Pathfinder panel.
- Select the mask object by clicking on it with the Selection tool. The mask object should be positioned above the object to be clipped in the Layers panel.
- To edit the mask, you can use any of the standard Illustrator tools, such as the Pen tool, Shape tools, or the Pathfinder panel. Make the desired changes to the mask object, such as adjusting its shape, size, or position.
- Once you have edited the mask object, select both the mask object and the object to be clipped by holding down the Shift key and clicking on each one.
- Go to Object > Clipping Mask > Edit Mask, or use the keyboard shortcut Ctrl+Alt+7 (Windows) or Command+Option+7 (Mac). This will bring up the Clipping Mask editing mode, which displays the clipped object and the mask object separately.
- In the Clipping Mask editing mode, you can further edit the mask object by using any of the standard Illustrator tools. You can also move or resize the clipped object within the mask, or make changes to its properties.
- Once you have finished editing the mask and the clipped object, click anywhere outside the Clipping Mask editing mode to exit and apply the changes.
- If you want to release the custom clipping mask and remove the clipping effect, select the clipped object and go to Object > Clipping Mask > Release, or use the keyboard shortcut Ctrl+Alt+7 (Windows) or Command+Option+7 (Mac).
That’s it! With these steps, you should be able to edit custom clipping masks in Adobe Illustrator. Keep in mind that custom clipping masks can be complex and may require some trial and error to achieve the desired effect, so don’t be afraid to experiment and try different approaches.
Examples of Custom Clipping Masks

Clipping Masks with Text
Clipping masks with text in Adobe Illustrator are a type of clipping mask where a text object is used as the mask for another object or group of objects. This allows you to create a variety of text effects and layouts by selectively revealing or hiding parts of the underlying objects.
How to edit clipping masks with text in Illustrator
To create a clipping mask with text, you would first create the text object and position it above the object or group of objects to be clipped in the Layers panel. Then, you would select both the text object and the underlying objects and go to Object > Clipping Mask > Make, or use the keyboard shortcut Ctrl+7 (Windows) or Command+7 (Mac) to create the clipping mask. Editing clipping masks with text in Adobe Illustrator is a straightforward process.
Here are the step-by-step instructions:
- Open your Illustrator document and locate the clipping mask with text that you want to edit.
- Select the text object by clicking on it with the Selection tool. The text object should be positioned above the object or group of objects to be clipped in the Layers panel.
- To edit the text, you can use any of the standard Illustrator text tools, such as the Type tool, Character panel, or Paragraph panel. Make the desired changes to the text, such as adjusting its font, size, or color.
- Once you have edited the text, select both the text object and the object or group of objects to be clipped by holding down the Shift key and clicking on each one.
- Go to Object > Clipping Mask > Edit Clipping Path, or use the keyboard shortcut Ctrl+7 (Windows) or Command+7 (Mac). This will bring up the Clipping Path editing mode, which displays the clipped object and the text object separately.
- In the Clipping Path editing mode, you can further edit the text object by using any of the standard Illustrator text tools. You can also move or resize the clipped object within the text, or make changes to its properties.
- Once you have finished editing the text and the clipped object, click anywhere outside the Clipping Path editing mode to exit and apply the changes.
- If you want to release the clipping mask and remove the text effect, select the clipped object and go to Object > Clipping Mask > Release, or use the keyboard shortcut Ctrl+Alt+7 (Windows) or Command+Option+7 (Mac).
That’s it! With these steps, you should be able to edit clipping masks with text in Adobe Illustrator. Keep in mind that text can be a powerful tool for creating interesting and dynamic design effects, and with some experimentation and creativity, you can use clipping masks with text to create a wide range of unique and visually appealing effects in your designs.
Examples of Clipping Masks with Text

Clipping Masks with Shapes
Clipping masks with shapes in Adobe Illustrator are a type of clipping mask where a shape object is used as the mask for another object or group of objects. This allows you to create a variety of shape effects and layouts by selectively revealing or hiding parts of the underlying objects.
How to Edit Clipping Masks with Shapes in Illustrator
To create a clipping mask with shapes, you would first create the shape object and position it above the object or group of objects to be clipped in the Layers panel. Then, you would select both the shape object and the underlying objects and go to Object > Clipping Mask > Make, or use the keyboard shortcut Ctrl+7 (Windows) or Command+7 (Mac) to create the clipping mask.
Here are the step-by-step instructions:
- Open your Illustrator document and locate the clipping mask with shape that you want to edit.
- Select the shape object by clicking on it with the Selection tool. The shape object should be positioned above the object or group of objects to be clipped in the Layers panel.
- To edit the shape, you can use any of the standard Illustrator shape tools, such as the Rectangle tool, Ellipse tool, or Pen tool. Make the desired changes to the shape, such as adjusting its size, position, or curvature.
- Once you have edited the shape, select both the shape object and the object or group of objects to be clipped by holding down the Shift key and clicking on each one.
- Go to Object > Clipping Mask > Edit Clipping Path, or use the keyboard shortcut Ctrl+7 (Windows) or Command+7 (Mac). This will bring up the Clipping Path editing mode, which displays the clipped object and the shape object separately.
- In the Clipping Path editing mode, you can further edit the shape object by using any of the standard Illustrator shape tools. You can also move or resize the clipped object within the shape, or make changes to its properties.
- Once you have finished editing the shape and the clipped object, click anywhere outside the Clipping Path editing mode to exit and apply the changes.
- If you want to release the clipping mask and remove the shape effect, select the clipped object and go to Object > Clipping Mask > Release, or use the keyboard shortcut Ctrl+Alt+7 (Windows) or Command+Option+7 (Mac).
That’s it! With these steps, you should be able to edit clipping masks with shapes in Adobe Illustrator. Keep in mind that shapes can be a powerful tool for creating interesting and dynamic design effects, and with some experimentation and creativity, you can use clipping masks with shapes to create a wide range of unique and visually appealing effects in your designs.
Examples of clipping masks with shapes

Clipping Masks with Multiple Layers
Clipping masks with multiple layers in Adobe Illustrator are a type of clipping mask where multiple objects or groups of objects are clipped to a single shape object. This allows you to selectively reveal or hide parts of multiple objects or layers using a single clipping mask shape.
How to Edit Clipping Masks with Multiple Layers in Illustrator?
To create a clipping mask with multiple layers, you would first create the shape object and position it above the objects or groups of objects to be clipped in the Layers panel. Then, you would select all the objects or groups of objects and the shape object and go to Object > Clipping Mask > Make, or use the keyboard shortcut Ctrl+7 (Windows) or Command+7 (Mac) to create the clipping mask.
Here are the step-by-step instructions:
- Open your Illustrator document and locate the clipping mask with multiple layers that you want to edit.
- Select the shape object by clicking on it with the Selection tool. The shape object should be positioned above the objects or groups of objects to be clipped in the Layers panel.
- To edit the shape, you can use any of the standard Illustrator shape tools, such as the Rectangle tool, Ellipse tool, or Pen tool. Make the desired changes to the shape, such as adjusting its size, position, or curvature.
- Once you have edited the shape, select all the objects or groups of objects that are clipped to the shape object by holding down the Shift key and clicking on each one.
- Go to Object > Clipping Mask > Edit Contents, or use the keyboard shortcut Ctrl+Click (Windows) or Command+Click (Mac). This will bring up the contents of the clipping mask in isolation mode.
- In isolation mode, you can edit each object or group of objects separately, using any of the standard Illustrator tools and features. You can also move or resize each object or group of objects, or make changes to their properties.
- Once you have finished editing the objects or groups of objects, click anywhere outside the isolation mode to exit and apply the changes.
- If you want to release the clipping mask and remove the shape effect, select the clipped objects and go to Object > Clipping Mask > Release, or use the keyboard shortcut Ctrl+Alt+7 (Windows) or Command+Option+7 (Mac).
That’s it! With these steps, you should be able to edit clipping masks with multiple layers in Adobe Illustrator. Keep in mind that clipping masks with multiple layers can be a powerful tool for creating interesting and dynamic layer effects, and with some experimentation and creativity, you can use them to create a wide range of unique and visually appealing effects in your designs.
Examples of Clipping Masks with Multiple Layers

Clipping Masks with Gradient Meshes
Clipping masks with gradient meshes in Adobe Illustrator are a type of clipping mask that allows you to selectively reveal or hide parts of a gradient mesh using a shape object. Gradient meshes are a type of mesh object in Illustrator that allows you to create smooth color transitions across a complex shape.
How to edit clipping masks with gradient meshes in Illustrator
To create a clipping mask with a gradient mesh, you would first create the shape object that you want to use as the clipping mask. Then, you would create a gradient mesh on top of the shape object and position it to cover the area that you want to mask. Finally, you would select both the shape object and the gradient mesh and use the Object > Clipping Mask > Make command to create the clipping mask.
Editing clipping masks with gradient meshes in Adobe Illustrator involves the following steps:
- Open the Illustrator document that contains the clipping mask with the gradient mesh you want to edit.
- Select the shape object that was used to create the clipping mask by clicking on it with the Selection tool.
- Go to Object > Clipping Mask > Edit Contents or use the keyboard shortcut Ctrl+7 (Windows) or Command+7 (Mac) to enter the isolation mode for the clipping mask.
- Once you are in isolation mode, you will see the gradient mesh that was clipped to the shape object. You can use any of the standard Illustrator tools, such as the Direct Selection tool or the Mesh tool, to edit the mesh.
- For example, you can select a mesh point or segment and use the Mesh tool to adjust the color or transparency of the mesh at that point or segment. You can also use the Direct Selection tool to move or delete mesh points or segments.
- If you want to edit the shape of the clipping mask itself, you can exit the isolation mode by clicking outside the mask or pressing the Escape key. Then, you can select the shape object and use any of the standard Illustrator tools to make changes to the shape.
- Once you have finished editing the clipping mask or the gradient mesh, exit the isolation mode by clicking outside the mask or pressing the Escape key.
- Finally, save your changes and close the Illustrator document.
That’s it! With these steps, you should be able to edit clipping masks with gradient meshes in Adobe Illustrator. Keep in mind that gradient meshes can be a powerful tool for creating complex gradient effects, and with some experimentation and creativity, you can use them to create a wide range of unique and visually appealing effects in your designs.
Examples of clipping masks with gradient meshes

Clipping Mask with Compound Path
Clipping mask with a compound path in Adobe Illustrator is a technique used to mask one or more objects with a complex shape. A compound path is a group of two or more objects that are treated as a single object, but with separate fill and stroke attributes. By creating a compound path and then using it as a clipping mask, you can reveal or hide parts of other objects based on the shape of the compound path.
How to create clipping masks with Compound Path in illustrator?
To create a clipping mask with a compound path, you would first select the objects you want to mask and then create a compound path by going to Object > Compound Path > Make or by using the keyboard shortcut Ctrl+8 (Windows) or Command+8 (Mac). Then, you would position the compound path object over the objects you want to mask and use the Object > Clipping Mask > Make command to create the clipping mask.
To create a clipping mask with a Compound Path in Adobe Illustrator, follow these steps:
- Open Adobe Illustrator and create a new document, or open an existing one.
- Create the objects that you want to mask with a compound path. You can create them using any of the drawing or shape tools in Illustrator.
- Select all the objects that you want to mask with a compound path by clicking and dragging over them with the Selection tool.
- Create a compound path by going to Object > Compound Path > Make or by using the keyboard shortcut Ctrl+8 (Windows) or Command+8 (Mac).
- Position the compound path object over the objects you want to mask. Make sure that the compound path is above the objects in the layer stack.
- Select both the compound path object and the objects you want to mask by clicking and dragging over them with the Selection tool.
- Create the clipping mask by going to Object > Clipping Mask > Make or by using the keyboard shortcut Ctrl+7 (Windows) or Command+7 (Mac).
- The objects are now masked by the compound path. You can move the objects or the compound path to adjust the mask as needed.
- To release the clipping mask, select the masked objects and go to Object > Clipping Mask > Release or use the keyboard shortcut Ctrl+Alt+7 (Windows) or Command+Option+7 (Mac).
That’s it! You have successfully created a clipping mask with a Compound Path in Adobe Illustrator.
Examples of Clipping Masks with Compound Path

Troubleshooting Clipping Masks
Clipping masks are an essential feature in Adobe Illustrator that allows designers to control the visibility of specific parts of an image or graphic. While they are incredibly useful, clipping masks can sometimes be challenging to work with, especially if you encounter common problems like incomplete or incorrect clipping, missing masks, incorrect layer order, transparent or empty masks, or other issues.
Common problems when working with clipping masks in Illustrator
- Incomplete or incorrect clipping: Sometimes, the clipping mask may not work as expected, and some parts of the image may remain visible even after applying the mask.
- Mask not showing up: The clipping mask may not appear in the Layers panel, even if it is present on the artboard. This can make it difficult to edit or manipulate the mask.
- Incorrect layer order: If the layer containing the clipping mask is not above the layer containing the image to be masked, the mask will not work correctly.
- Transparent or empty masks: Sometimes, the clipping mask may appear to be working correctly, but the masked area is transparent or empty.
How to troubleshoot problems with clipping masks in Illustrator?
- Check the layer order: Make sure that the layer containing the clipping mask is above the layer containing the image to be masked. To change the layer order, select the layer and drag it up or down in the Layers panel.
- Check the mask shape: Ensure that the mask shape completely covers the area that needs to be masked. You can edit the mask shape by selecting the mask and using the Direct Selection tool or the Pen tool to adjust the shape.
- Check the mask mode: Ensure that the mask mode is set to “Clip” rather than “Opacity.” To check the mask mode, select the mask and go to the Transparency panel. If the mask mode is set to “Opacity,” change it to “Clip.”
- Check the transparency: If the masked area is transparent or empty, ensure that the layer containing the image to be masked is not set to 100% opacity. To check the opacity, select the layer and adjust the opacity slider in the Transparency panel.
- Check for hidden layers: If the clipping mask is not showing up in the Layers panel, ensure that it is not hidden or locked. To check for hidden layers, go to the Layers panel and look for a small eye icon next to the layer name. If the eye icon is not present, the layer is hidden. To unhide the layer, click on the empty box next to the eye icon.
Conclusion
In this article, we discussed common problems that designers may encounter when working with clipping masks in Illustrator. These include incomplete or incorrect clipping, missing masks, incorrect layer order, transparent or empty masks, or other issues. We also provided troubleshooting tips to help you resolve these problems, such as checking the layer order, adjusting the mask shape, checking the mask mode, adjusting transparency, and ensuring that the clipping mask is not hidden or locked.
Clipping masks are a powerful tool for designers, allowing them to control the visibility of specific parts of an image or graphic. They can be used to create unique effects, highlight specific elements, or simply to ensure that a design looks polished and professional. By mastering clipping masks and understanding how to troubleshoot common issues, designers can take their skills to the next level and create stunning visuals that capture their clients’ attention.
If you’re interested in learning more about Adobe Illustrator and its various tools and techniques, there are plenty of resources available. Adobe offers a wide range of tutorials, guides, and forums for users of all skill levels. Additionally, there are numerous online courses, books, and workshops that can help you master specific skills or techniques. By taking advantage of these resources and investing time in learning the software, you can become a skilled Illustrator user and create designs that stand out in a crowded marketplace.