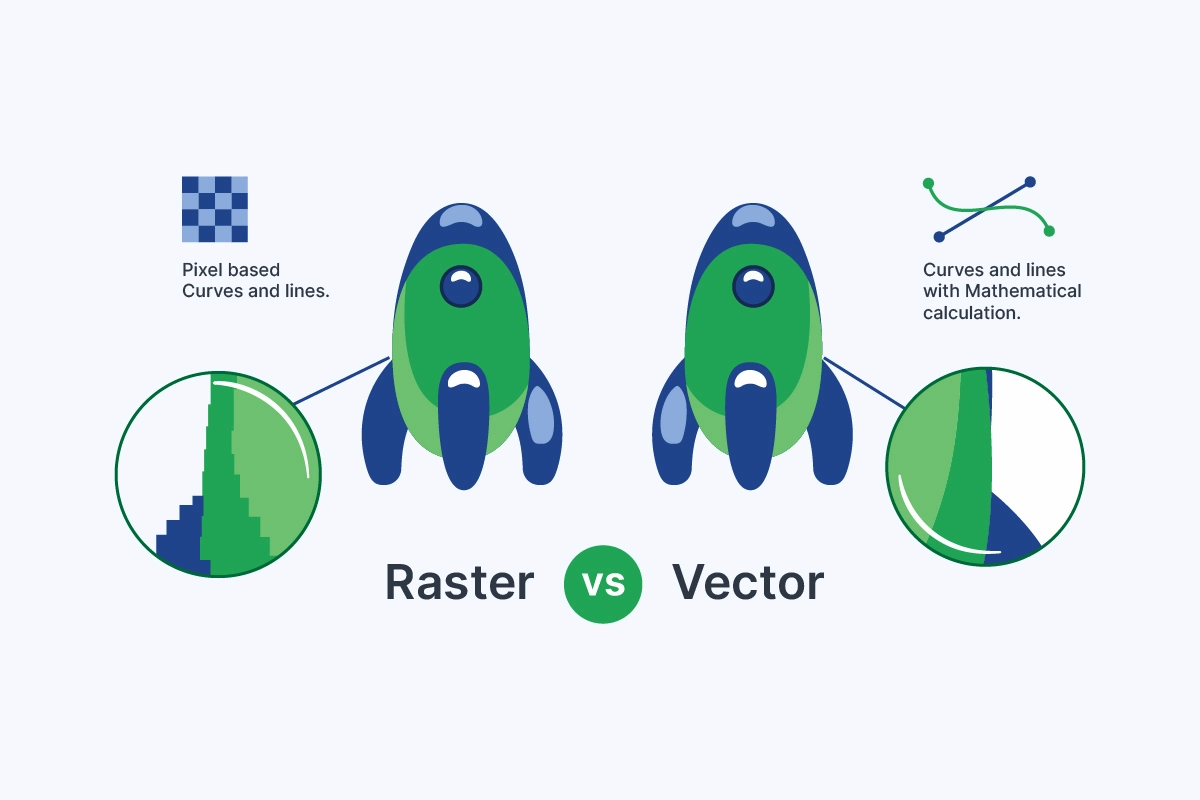
Raster and vector are two fundamental types of digital image formats, each with distinct characteristics and optimal use cases. Raster images, composed of pixels, excel in representing complex visual data like photographs. On the other hand, vector images, constructed from mathematical formulas, offer infinite scalability without loss of quality, making them ideal for logos and illustrations.
What Is a Raster File?
A raster file, also called a bitmap image, is made of a grid of pixels, each storing color data. Common formats include JPEG, PNG, and GIF. Raster images are ideal for detailed photographs and complex graphics.
However, they have fixed resolutions, which can lead to pixelation when resized. Despite this, they’re widely compatible across platforms.
What Is a Vector File?
A vector file, such as an SVG or Adobe Illustrator (AI) file, is composed of mathematical formulas that define shapes, lines, and curves. Vector files maintain crispness and clarity at any size.
This makes them perfect for logos, icons, and illustrations, offering versatility across various digital and print mediums. Graphic designers and digital artists favor vector files for their scalability and precision, making them essential for professional design projects.
What Is The Difference Between Raster and Vector Files?
Raster and vector files are two primary formats used in digital design, each with distinct characteristics and applications. Understanding the differences between them is essential for choosing the right format for your design projects.
| Aspect | Raster Graphic | Vector Graphic |
| Resolution | Measured in pixels per inch (PPI) or dots per inch (DPI). | Resolution-independent; defined by mathematical formulas. |
| Uses | Ideal for photographs, digital paintings, and complex visuals requiring detailed pixel-based representation. | Suited for logos, icons, illustrations, and designs needing scalability and flexibility. |
| File sizes | Often larger due to storing individual pixel info. | Smaller as they only store mathematical equations. |
| Conversion | Lose quality when resized or converted. | Can be converted to raster formats without loss? |
| Editing Software | Compatible with most image editing software. | May require specialized vector editing tools. |
| File Types | JPEG, PNG, GIF, TIFF, BMP, RAW | AI, SVG, EPS, PDF, DXF, DWG, EMF |
| Common Extensions | .jpg, .png, .gif, .tiff, .bmp, .raw | .ai, .svg, .eps, .pdf, .dxf, .dwg, .emf |
Human-Powered Image to Vector Conversion
Are you looking for human-powered (not a robot) image to vector conversion services? Transform low-quality or pixelated images into crisp, scalable vector graphics.
How to Create a Vector Image?
Creating a vector image involves using specialized software designed for vector graphics, such as Adobe Illustrator, Inkscape, or CorelDRAW. Follow these steps to create a vector image:
- Choose Your Software: Select a vector graphics editor that suits your needs and expertise level. Adobe Illustrator is a popular choice for professional designers, while Inkscape offers a free and open-source alternative.
- Start a New Project: Launch the vector graphics software and create a new document or project. Specify the dimensions and orientation of your artwork based on your intended use.
- Draw Your Design: Use the drawing tools provided by the software to create shapes, lines, and curves. Experiment with different tools, such as the Pen Tool, Shape Tools, and Bezier Curves, to bring your vision to life.
- Add Color and Effects: Customize your vector image by adding colors, gradients, and effects. Most vector graphics software offers a wide range of color palettes, swatches, and blending options to enhance your artwork.
- Fine-tune Your Design: Refine your vector image by adjusting shapes, resizing elements, and aligning objects. Take advantage of features like layers and grouping to organize your artwork and make editing easier.
- Save Your Work: Once you’re satisfied with your vector image, save your work in the appropriate file format, such as AI (Adobe Illustrator), SVG (Scalable Vector Graphics), or EPS (Encapsulated PostScript). Consider exporting a copy of your image in other formats for different purposes, such as PNG for web use or PDF for printing.
How to Create a Raster Image?
Creating a raster image involves capturing or digitally creating an image composed of individual pixels. Here’s a step-by-step guide on how to create a raster image:
- Choose Your Image Source: Decide whether you want to create a raster image from scratch using digital drawing tools or capture an existing image using a camera or scanner.
- Select Your Digital Drawing Software: If you’re creating a raster image digitally, choose a software program that supports raster graphics, such as Adobe Photoshop, GIMP, or Corel PaintShop Pro.
- Set Up Your Canvas: Open your chosen software and create a new document or project. Specify the dimensions, resolution, and color mode (RGB or CMYK) for your raster image based on your intended use.
- Sketch or Draw Your Image: Use the drawing tools provided by the software to sketch or draw your image on the canvas. Experiment with different brushes, pencils, and textures to achieve the desired look and feel.
- Add Color and Detail: Apply colors, shading, and details to your image to enhance its appearance. Use layers to separate different elements of your image and make editing easier.
- Edit and Fine-Tune: Refine your raster image by adjusting colors, contrast, and composition. Take advantage of features like filters, adjustment layers, and blending modes to achieve the desired effect.
- Save Your Image: Once you’re satisfied with your raster image, save your work in a raster-compatible file format, such as JPEG, PNG, or TIFF. Consider saving a copy of your image in a lossless format like TIFF if you need to preserve maximum quality for future editing.
When To Choose Raster vs Vector?
Choosing between vector and raster images depends on various factors, including the specific requirements of your project and the intended use of the image. Here’s a guide to help you decide when to choose vector or raster:
Choose Vector When:
- Scalability is Key: If you need your image to be resized without loss of quality, such as for logos, icons, or illustrations, choose vector graphics. Vectors are resolution-independent and can be scaled infinitely without pixelation.
- Precision is Required: For designs that require precise shapes, lines, and curves, such as technical drawings or typography, vectors offer superior precision and clarity.
- Flexibility is Needed: When you anticipate the need to edit or modify your image frequently, vectors provide flexibility. Elements in vector graphics can be easily manipulated, rearranged, and modified without loss of quality.
- Outputting to Multiple Formats: If you need your image to be used across various mediums and formats, such as print, web, or signage, vectors are versatile and adaptable to different output requirements.
Choose Raster When:
- Photographic Detail is Essential: For images with intricate color variations, textures, and photographic detail, such as photographs or digital paintings, raster graphics excel in capturing these nuances.
- Working with Realistic Images: When your design requires a natural or realistic appearance, raster images offer better rendering of organic shapes and textures, making them ideal for natural scenes or portraits.
- Specific Resolution is Needed: If your project has specific resolution requirements, such as print materials with fixed dimensions and resolutions, raster images allow you to control the level of detail and clarity.
- Faster Processing: In some cases, raster graphics may be faster to process or edit, especially for complex or large-scale images, as they do not require complex mathematical calculations like vector graphics.
Human-Powered Image to Vector Conversion
Are you looking for human-powered (not a robot) image to vector conversion services? Transform low-quality or pixelated images into crisp, scalable vector graphics.
Pros and Cons of Vector Graphics in Digital Artwork
Vector graphics offer scalability and precision, making them ideal for logos and illustrations. They have compact file sizes but may lack in capturing complex textures. Additionally, they require specialized software and expertise. Despite limitations, they offer efficiency and flexibility in digital artwork.
Pros and Cons of Vector Graphics in Product Artwork
Vector graphics offer unmatched scalability for product logos and packaging. Their precise editing allows easy adjustments, maintaining brand consistency. Compact file sizes reduce storage needs. However, they may struggle with intricate textures and require specialized software and expertise. Despite limitations, vector graphics remain invaluable for their scalability, precision, and efficiency in product artwork.

